

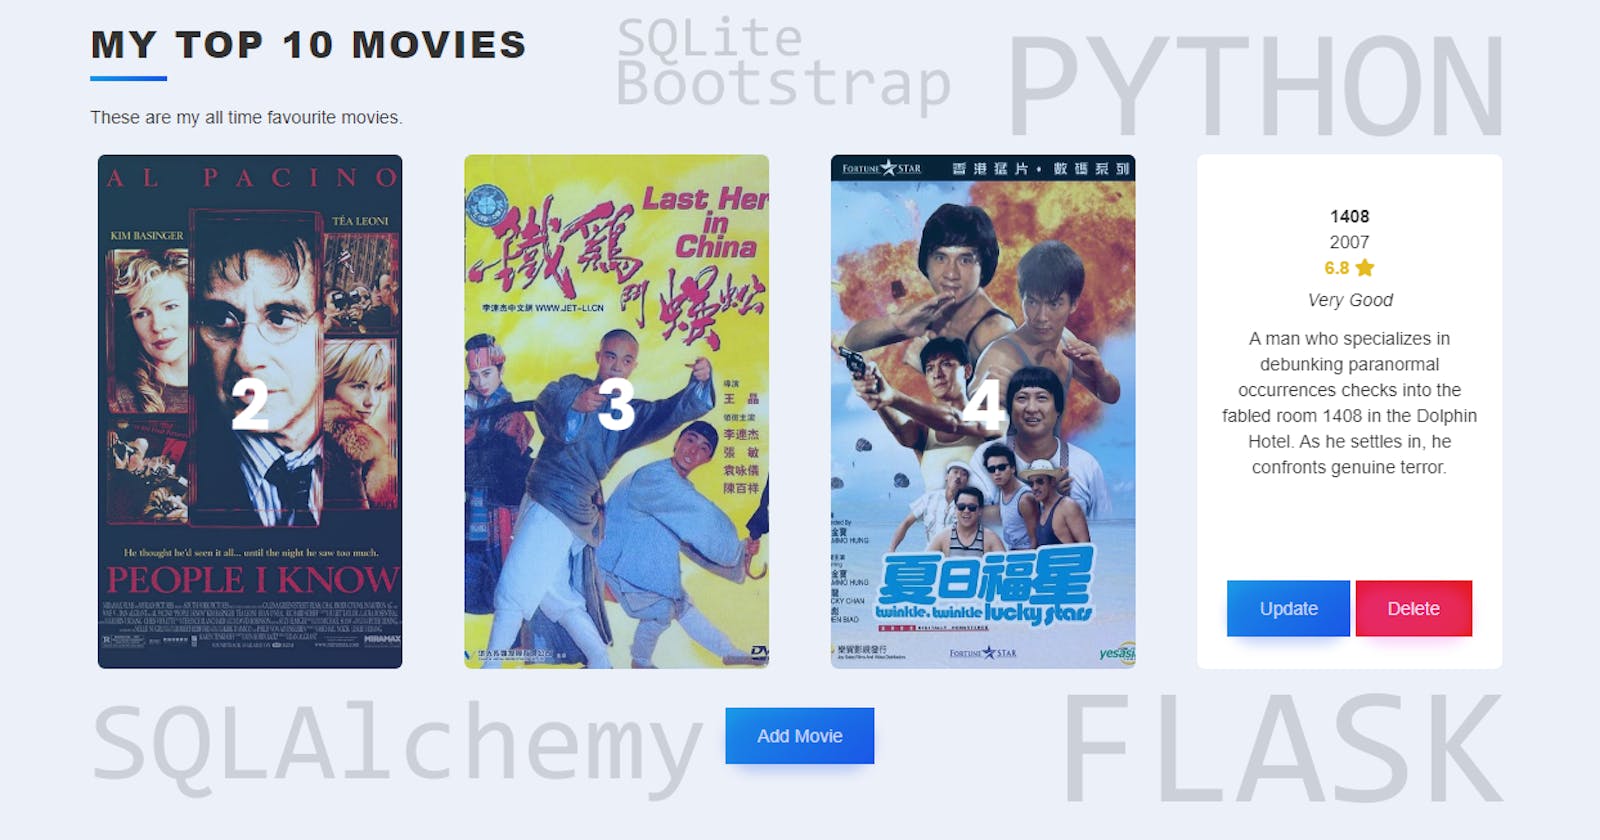
Sorry for absence I needed to let my brain to work and soak in all the information from learning the Python. So, today we are going to make a webpage with the ranking of favourite movies using Python, SQLite, Flask, SQLAlchemy and Jinja language. So:
- Flask - is a python framework that allows to work with html.
- SQLite - free database engine
- SQLAlchemy - SQLAlchemy is an extension for Flask that make the work with SQL database.(easier CRUD, ordering filtering and ets.)
- Jinja - is a fast, expressive, extensible templating engine for the Python programming language. The structure or our project will be like this:
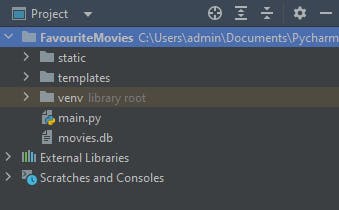
- Templates folder is where all our html files will go (we will
rendereach later with a Flask) - Static folder is where everything else will go, like styles, images and ets.
- All the python files will go in the main directory.
So, as always,first we will install and import all the libraries:
from flask import Flask, render_template, redirect, url_for, request
from flask_bootstrap import Bootstrap
from flask_sqlalchemy import SQLAlchemy
from sqlalchemy import desc
Then we will create our app using Flask
app = Flask(__name__)
Also, here we will connect to our database and Bootstrap. If it doesn't exist it will be created automatically.(In our case it doesn't exist so it will be created)
app.config['SQLALCHEMY_DATABASE_URI'] = 'sqlite:///movies.db'

db = SQLAlchemy(app)
Bootstrap(app)
Next we will create the Movie table inside of our database (remember, you can have multiple tables inside of one database). For example, if we create the shop website for the client we will have one database and inside of it will be multiple tables. After the table will be created you can comment out db.create_all() cause we don't need to create it again.
class Movie(db.Model):
    id = db.Column(db.Integer, primary_key=True)
    title = db.Column(db.String(250), unique=True, nullable=False)
    release_date = db.Column(db.Integer, nullable=False)
    rating = db.Column(db.Float, nullable=False)
    review = db.Column(db.String(250), nullable=False)
    overview = db.Column(db.String(250), nullable=False)
    img_url = db.Column(db.String(250), nullable=False)


    def __repr__(self):
        return '<Movie %r>' % self.title

db.create_all()
Now we will define our home page that will be the root of our website. Here we will display all the movies (aka records) from our database ordered by thee ranking: the highest rating movies are comming first
We will use .order_by(Movie.rating).all() to order movies by rating (it will order them from lowestto highest by the defaultand to reverse the order we will add desc so .order_by(desc(Movie.rating)).all()
Finnally,to use our movies data inside of our html we will pass it inside render_template()
@app.route("/")
def home():
    all_movies = Movie.query.order_by(desc(Movie.rating)).all()
    return render_template("index.html", movies=all_movies)
Also, to make it easier for us to debugg and run, stop our application we can just put this code at the very end of the document. It will allow us to run and stop the app with just play button in the PyCharm and to refresh the content by just saving the document after changes on the run without the need to stop and rerun the document.
if __name__ == '__main__':
    app.run(debug=True)
Now, to make it all work we will create our index.html file using the bootstrap. That's where our Jinja comes handy: we will use different delimiters, super block and ets. you can check the documentation:
- {% ... %} for Statements
- {{ ... }} for Expressions to print to the template output
- {# ... #} for Comments not included in the template output gives back the results of the parent block:
{% extends 'bootstrap/base.html' %}

{% block styles %}
  {{ super() }}
  <link rel="stylesheet" href="https://fonts.googleapis.com/css?family=Nunito+Sans:300,400,700">
  <link rel="stylesheet" href="https://fonts.googleapis.com/css?family=Poppins:300,400,700">
    <link rel="stylesheet" href="https://fonts.googleapis.com/css?family=Poppins:300,400,700">
    <link rel="stylesheet" href="https://cdnjs.cloudflare.com/ajax/libs/font-awesome/5.14.0/css/all.min.css" integrity="sha512-1PKOgIY59xJ8Co8+NE6FZ+LOAZKjy+KY8iq0G4B3CyeY6wYHN3yt9PW0XpSriVlkMXe40PTKnXrLnZ9+fkDaog==" crossorigin="anonymous" />
Flask automatically adds a static view that takes a path relative to the flaskr/static directory and serves it. The base.html template already has a link to the style.css file:
{{ url_for('static', filename='style.css') }}
  <link rel="stylesheet" href="{{ url_for('static', filename='css/styles.css') }}">
{% endblock %}

{% block title %}My Top 10 Movies{% endblock %}

{% block content %}
<div class="container">
    <h1 class="heading">My Top 10 Movies</h1>
    <p class="description">These are my all time favourite movies.</p>
The sintax is simmilar to Python, so we will use for loop to show all the movies inside of our html, each with same formatting.
The movies come from our main.py
Remember, earlier we rendered our index.html with movies that we extracted from our database? So no we can easily select attributes of our movie object.
   {% for movie in movies: %}
    <div class="col-lg-3 col-sm-6">
        <div class="card" >
            <div class="front" style="background-image: url('{{ movie.img_url }}');">
                <p class="large">{{ movie.id }}</p>
            </div>
            <div class="back">
                <div>
                    <div class="title">
                        {{ movie.title }}</br>
                        <span class="release_date">{{ movie.release_date }}</span>
                    </div>
                    <div class="rating">
                        <label>{{ movie.rating }}</label>
                        <i class="fas fa-star star"></i>
                    </div>
                    <p class="review">{{ movie.review }}</p>
                    <p class="overview">{{ movie.overview }}</p>
Instead of putting the link directly we will build it inside of our main.py .
                    <a href="{{ url_for('edit', id=movie.id) }}" class="button">Update</a>
                    <a href="{{ url_for('delete', id=movie.id) }}" class="button delete-button">Delete</a>
                </div>
            </div>
        </div>
    </div>
    {% endfor %}
</div>
<div class="container text-center add">
<a href="{{ url_for('add', page='add.html') }}" class="button">Add Movie</a>
</div>

{% endblock %}
Now, lets make our Add page work. Remember, that on click we made our button to redirect us to add.html page. Inside the add page we create usual form. Also, if you have a progect where the header and footer are same on each page, you can separate them from main content and put them into separate html files and refer to them inside each page with {% include 'header.html' %} at the top and {% include 'footer.html' %} at the bottom. But for now we don't need it.
{% extends 'bootstrap/base.html' %}

{% block styles %}
  {{ super() }}
  <link rel="stylesheet" href="https://fonts.googleapis.com/css?family=Nunito+Sans:300,400,700">
  <link rel="stylesheet" href="https://fonts.googleapis.com/css?family=Poppins:300,400,700">
  <link rel="stylesheet" href="{{ url_for('static', filename='css/styles.css') }}">
{% endblock %}

{% block title %}Add Movie{% endblock %}

{% block content %}
<div class="content">
    <h1 class="heading">Add a Movie</h1>
Don't forget to turn off the browser automatic validation
    <form action="{{ url_for('add') }}" method="POST" novalidate>
        <label>Movie Name</label>
        <input type="text" name="title"></br>
        <label>Release Date</label>
        <input type="text" name="release_date"></br>
        <label>Rating</label>
        <input type="text" name="rating"></br>
        <label>Review</label>
        <input type="text" name="review"></br>
        <label>Overview</label>
        <input type="text" name="overview"></br>
        <label>Image URL</label>
        <input type="text" name="img_url"></br>
        <button type="submit" class="button">Add Movie</button>
    </form>
</div>
{% endblock %}
Now, we will handle this form inside our main.py. In the rout we will add the create and read methods.
- POST - create
- GET - read
- PUT - update(replace)
- PATCH - update(modify)
- DELETE - delete
Remember, that earlier inside of our form we used POST, so
@app.route("/add", methods=["GET", "POST"]) def add(): if request.method == "POST":movie = Movie(title=request.form["title"], release_date=request.form["release_date"], rating=request.form["rating"], review=request.form["review"], overview=request.form["overview"], img_url=request.form["img_url"])
        db.session.add(movie)
        db.session.commit()
        return redirect(url_for('home'))
Remember that we are still inside of our if statement. Outside of it we will just simply render the add page, meaning if the form is not submitted, the user stayes on the add page
return render_template('add.html')
Now, lets make our edit button work
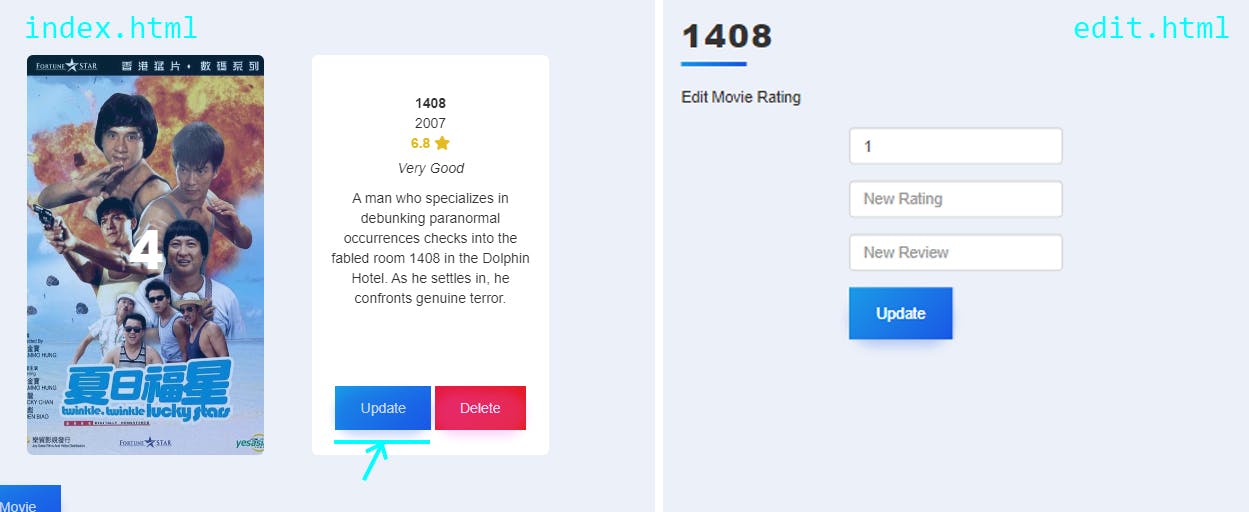 The structure same as in the
 add.html page except this time we will have one hidden input with the id selector
{% extends 'bootstrap/base.html' %}
{% import "bootstrap/wtf.html" as wtf %}

{% block styles %}
  {{ super() }}
  <link rel="stylesheet" href="https://fonts.googleapis.com/css?family=Nunito+Sans:300,400,700">
  <link rel="stylesheet" href="https://fonts.googleapis.com/css?family=Poppins:300,400,700">
  <link rel="stylesheet" href="{{ url_for('static', filename='css/styles.css') }}">
{% endblock %}

{% block title %}Edit Movies{% endblock %}

{% block content %}
<div class="content">
    <h1 class="heading">{{movie.title}}</h1>
    <p class="description">Edit Movie Rating</p>
Don't forget to turn off the browser auto validation
    <form action="{{ url_for('edit') }}" method="POST" novalidate>
        <div class="form-group">
first input is a hidden one with id selector( here we specify which record from our database table we need to update)
            <input hidden="hidden" class="form-control" name="id" value="{{movie.id}}">
        </div>
        <div class="form-group">
            <input class="form-control" name="rating" type="text" placeholder="New Rating">
        </div>
        <div class="form-group">
            <input class="form-control" name="review" type="text" placeholder="New Review">
        </div>
        <button type="submit" class="button">Update</button>
    </form>
</div>
{% endblock %}
Inside of our main.py we will handle our form
@app.route("/edit", methods=["GET", "POST"])
def edit():
    if request.method == "POST":
now, we will extract id from our form and asign it to a variable that we will use to select a specific record from database table by primary key(aka id) and then rewrite the rating and review values, replace them with the values extracted from th form.
        m_id = request.form["id"]
        movie_to_update = Movie.query.get(m_id)
        movie_to_update.rating = request.form["rating"]
        movie_to_update.review = request.form["review"]
Now, after commiting the changes we will redirect user to the home page.
        db.session.commit()
        return redirect(url_for('home'))
request.args is a MultiDict with the parsed contents of the query string. From the documentationof get method: get(key, default=None, type=None)
Return the default value if the requested data doesn’t exist
    movie_id = request.args.get('id')
    movie_selected = Movie.query.get(movie_id)
    return render_template('edit.html', movie=movie_selected)
Lastly, we will makec our delete button work
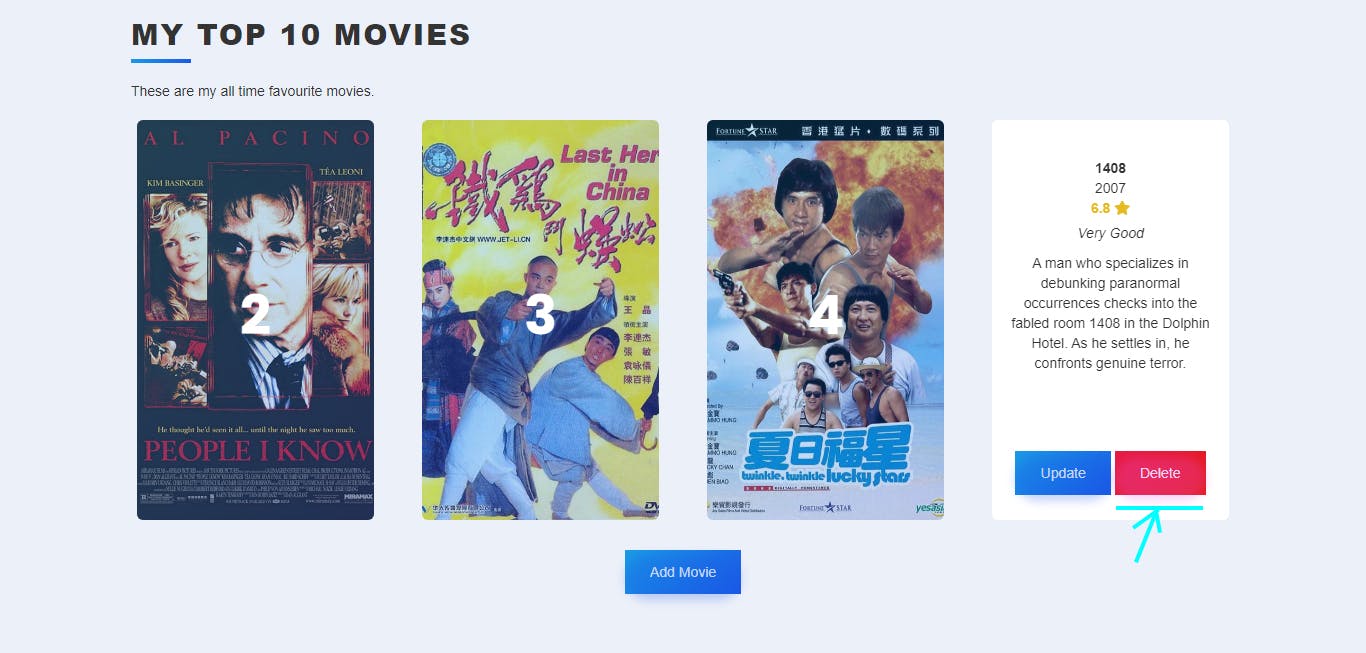
Similar structure as edit. We will get the id of the selected item from our html page and use it inside of our selector.
@app.route("/delete")
def delete():
    movie_id = request.args.get('id')

    # DELETE A RECORD BY ID
    movie_to_delete = Movie.query.get(movie_id)
Now we can simply delete selected item, commit changes and when the operation is finished redirect user to the home page.
    db.session.delete(movie_to_delete)
    db.session.commit()
    return redirect(url_for('home'))